Tuesday, April 9, 2013

German Pancakes


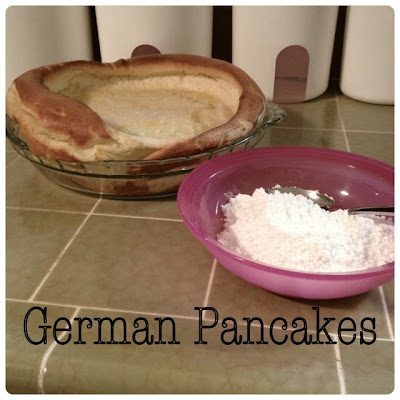
German Pancakes, what can I say? They are sooo delicious and are definitely my favorite breakfast food. My dad is full German and his mother always made him German Pancakes and German Potatoe Pancakes. I had both growing up, but these are definitely my favorite of the two. I've seen other similar recipes, but none that are exactly like the one I have. They always come out super fluffy and delicious. They are super easy too! Basic ingredients, a blender, and a pyrex pan will get you magic. Everytime I make them I actually make two, so I double the recipe - so my blender will look a lot fuller than yours if you are doing one =]

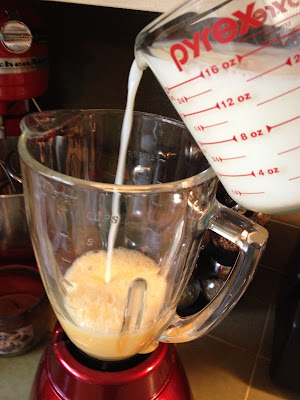
Pre-heat your oven to 425 and grab your blender and 9 inch round pan. Put the butter in the center of the baking dish and into the oven for the butter to melt.  Beat your eggs first in the blender and then pour in the milk.


Now put in all the rest of your ingredients in and blend. Make sure to scrape down the sides so it's all mixed well. Pour your batter into the center of your pan where the butter melted. The melted butter is what makes the edges rise and brown the way they do.


And now you're ready for the oven. Pop it in for 25 minutes and let the magic begin. When you pull it out it should look fluffy with the edges raised. Stick a knife in the middle to make sure it's done.


We always put butter, powdered sugar and freshly squeezed lemon juice on ours, but you can really put any toppings you'd like. I've also done them with fresh strawberries and my husband is a weirdo and cakes them in regular syrup.


German Pancakes

Ingredients
  • 2  tablespoons butter
  • 2  eggs
  • 1  cup flour
  • 1  cup milk
  • ¼ cup sugar
  • ¼ teaspoon salt
  • ¼ teaspoon vanilla
  •  toppings

Saturday, April 6, 2013

2013 Nissan Versa - Middle Console Removal - Not Even Joking ...


So I'm sure you're asking, why the heck is she posting a how to on removing a car's center console?

Well let me set up the story for you. It is Easter morning. We are all scrambling to get in the car and get to the church by 8am, and like usual it's a mad dash. We finally get in the car with all of our accoutrements - 2 adults, 1 toddler, the diaper bag, the sippy cup, the binky, the camera bag, the guitar, the backpack with guitar accessories, the cupcakes, the dip, and other various food items for lunch after church. I realize it's getting pretty late in the morning and I need to take my birth control pill. I ask my husband if he can get it for me, because I'm driving. He proceeds to take out the packet, push the pill out and of course drops it on the parking brake. He yells, "STOP!" Which, of course, I cannot do because we are DRIVING ON THE ROAD (can you tell I'm still a tad bitter). So the pill continues to slide and eventually drops right down one of the holes in the center console. He's saying it's lost forever, I'm saying, no, it's only momentarily out of our grasps.

So yesterday, while on my lunch break, I took it upon myself to get the blessed pill back. I searched and searched. There were no Youtube videos, no real tutorials on how to take this stupid thing apart, so hence, here is the tutorial. It's actually really easy and my 1 year told could have probably figured it out, but nonetheless, here it is.

What You'll Need:

A screwdriver - actually 2 (I have a set that comes with changeable heads). One needs to be a PZ2 and the other needs to be T20.


First take the screwdriver with the PZ2 head and take out the screws in the back by the back cup holders. 


Next take the T20 screwdriver and loosen the plastic screws on either sides of the front cup holders. These are just plastic screws and it only takes a quarter turn and they pop out. Then you'll have to forcibly pull the rest of the plastic pieces out.


And that's it! THen just pull the whole cover off. Mission: Completed! I was able to grab my pill right out of there and then just put everything back on. Have fun!

Cream Puff Cake


Growing up, it seemed like my parents were always doing some sort of diet, and I would inevitably be stuck eating at least some of their concoctions. My favorite was when they did slimfast - ha! I LOVED taking little sips of their magical milkshakes! At one point they began doing the low carb diet. They ate some pretty nasty sounding stuff - pancakes and french toast made from pork rinds was constantly on the menu. While I refused to eat most of it, I did come to love cream puffs. My mom would always make them, and for her and my dad she would load them with whipped cream and nuts, but she would always fill mine with pudding - yum! So when I came across a recipe for cream puff cake, I automatically had a sudden craving for it. So I made it and took it over to dinner with my parents so we could reminisce on those cream puff days.

The thing with cream puffs is, they're ridiculously easy. Pre-heat your oven to 400.  First throw your butter and water on the stove top until it boils.


Next, have your flour ready and pour the butter/water mixture on top. Stir well and allow it to cool slightly.  It should have a cream of wheat type consistancy right now.


Beat in eggs, one at a time. You'll notice your batter growing in proportion with each egg.  Poor and spread evenly into a greased 13x9 pan.


Put it in your oven for 30 minutes at 400. Once it's done, allow it to completely cool before putting your pudding mixture in it.


Grab another mixing bowl and beat pudding mix, cream cheese, and milk until there are no lumps. Making sure that the cream puff crust has cooled, pour your pudding mixture on top. At this point I covered it and let it chill in the fridge because it wasn't going to be served until the next day. I would recommend letting it chill for at least an hour so the pudding can set. I chose to do chocolate for this one, but with pudding flavors, the possibilities are endless. Maybe banana next time?


Next top with cool whip, and your favorite toppings - I used chocolate syrup and crushed walnuts. Enjoy!


Cream Puff Cake

Ingredients
  • 1 cup water
  • 1 stick butter
  • 1 cup flour
  • 4 eggs
  • 1 large package instant pudding
  • 8oz package cream cheese
  • 3 cups milk
  • 1 tub cool whip
  •  toppings

Wednesday, April 3, 2013

Crownies


So I knew that I wanted to do some baking last night, so I started surfing through Pinterest and I came across a picture that I'd seen before; a cookie on top of a brownie, also known as the "crownie." It once again intrigued me. I clicked on the picture and of course I was saddened to see that it was one of those pins like the doors in the Winchester Mystery House - it led to nowhere. No recipe. Ugh. So I typed in crownie in the search bar and starting sifting through different pins. Most were done in pans, so they came out more like bars, but I definitely wanted to do them in muffin tins. Every recipe I saw said to put the two together and bake for 30 minutes, but they obviously used different recipes than my go to cookie recipe and I was afraid that the brownies on the bottom would not get done and the cookies on the top would burn, so I kinda just did my own thing and they turned out fabulous. So here it is!

Pre-heat your oven to 350° and spray or grease your muffin tins. Start with doing your cookie batter and then set aside. My recipe calls for two cups of semi-sweet chocolate chips, but I did half chocolate and half Reese's chips just to give it a little peanut butter kick.


Then whip up your brownie batter and get ready for some magic! And yes, I did use a boxed brownie mix - whatever. I was completely out of cocoa powder and I just happened to have a box of brownie mix from the last time I had a late night craving that I eventually talked myself out of.


Next - the assembly. I found the best way to do this was to use a cookie scoop. I had just bought one and I decided to use it so I knew I had the same amount in every tin. My mom always taught me to spoon-drop my cookies, and so I became this sort of spoon-drop cookie snob and I looked down on those that used scoops, but NO MORE. I love this thing, and I'll be using it from now on. So use your scoop to do the bottom brownie layer in the tins. Put them in the oven for 10-12 minutes and pull them out. The edges should be solid but the centers should still be ooey gooey.


Turn your oven up to 375°. At this point, take a knife or fork and mush up the centers; I did this to make sure my cookies would stick well to the brownies, since I wasn't baking both batters together all at once.


Next, grab your cookie scoop and put on your cookie layer.


Put them back in the oven for another 10 minutes and prepare to be amazed. The cookies should be golden brown on the top, and the centers may still be a little dough-ey, but this is usually how this cookie recipe has always come out for me. I waited like 10 minutes to pop them out just to make sure the cookie part didn't fall apart and behold - they were perfect! The brownies were perfectly baked all the way through and my cookies weren't burnt at all!


My brownie batter allowed enough for about 17 Crownies, then I just baked the rest of my cookies with the superfluous ( I love that word) dough.  Enjoy!
 
For the Cookie Layer:
 
Ingredients
  •  2 ¾  cup flour
  •  1 teaspoon baking soda
  •  1 teaspoon salt
  •  1 cup (2 sticks) butter, softened
  •  ¾ cup brown sugar (packed)
  •  ¾ cup sugar
  •  1 teaspoon vanilla
  •  2 eggs
  •  2 cups semi-sweet chocolate chips
Directions
  1. Whisk together dry ingredients (flour, baking soda, and salt) and set aside.
  2. In a mixing bowl, cream together butter, brown sugar, and sugar. Mix in vanilla, and beat in eggs one at a time.
  3. Gradualy mix in dry ingredients, during a third at a time and finally stir in chocolate chips.
 
For Brownie Layer:
 
Ingredients
  • 1 brownie mix
  • 1 egg
  • ¼  cup water
  • ¼  cup vegetable oil
Directions
  1. Read the box! Ha, just mix it all together!
 
Bakers Tip: When you do the brown sugar in your cookie recipe, pack the crap out of that stuff! My mom taught me to use brown sugar like there's no tomorrow and that's why these cookies always come out sooo delicious! Enjoy!


Monday, April 1, 2013

Easter Yummies


Easter treats would not be complete without Cadbury Eggs, so this year I decided to put them inside cupcakes - and they were oh so delicious. So simple too! The only thing that definitely wasn't "simple" about these was the frosting I decided to do to go on them, but let's deal with the actual cupcakes first.

You'll want to freeze your Cadbury Eggs beforehand so they won't just turn to mush in the oven. The recipe I found on Pinterest used a much more dense looking cupcake batter, so I decided to do a pink velvet cake, and once again, I used good ol' Martha's recipe. I'll list it below.

First, whip up your cupcake batter.


Next, fill your cupcake tins about 1/4 full and stick those little eggs in the middle, heavier side down.


Continue to poor the batter on top of the eggs till your batter is at normal cupcake volume (about 3/4 full). You'll see the tips of the eggs poke out just a little bit on the top.


Then just bake your little beauties, that's pretty much it for the cupcake part. For those that would like to copy Martha's Red Velvet Cake Recipe - here it is:
 

Ingredients

  • 2 1/2 cups cake flour (not self- rising), sifted
  • 2 tablespoons unsweetened Dutch-process cocoa powder
  • 1 teaspoon salt
  • 1 1/2 cups sugar
  • 1 1/2 cups vegetable oil
  • 2 large eggs, room temperature
  • 1/2 teaspoon red gel-paste food color
  • 1 teaspoon pure vanilla extract
  • 1 cup buttermilk
  • 1 1/2 teaspoons baking soda
  • 2 teaspoons distilled white vinegar

Directions

  1. Preheat oven to 350 degrees. Line standard muffin tins with paper liners. Whisk together cake flour, cocoa, and salt.
  2. With an electric mixer on medium-high speed, whisk together sugar and oil until combined. Add eggs, one at a time, beating until each is incorporated, scraping down sides of bowl as needed. Mix in food color and vanilla.
  3. Reduce speed to low. Add flour mixture in three batches, alternating with two additions of buttermilk, and whisking well after each. Stir together the baking soda and vinegar in a small bowl (it will foam); add mixture to the batter, and mix on medium speed 10 seconds.
  4. Divide batter evenly among lined cups, filling each three-quarters full. Bake, rotating tins halfway through, until a cake tester inserted in centers comes out clean, about 20 minutes. Transfer tins to wire racks to cool completely before removing cupcakes. Cupcakes can be stored overnight at room temperature, or frozen up to 2 months, in airtight containers.
 
Now onto the craziness of my Easter Cupcake shenanigans - the "Magical Frosting."  I found this recipe on Pinterest from melskitchencafe.com, but it's apparently all over the internet in different variations. It's not actually a hard recipe, there's just a lot of waiting involved, and patience is definitely not one of my callings. Here's the recipe, with some of my own notes.
 
Ingredients
  • 1 1/2 cups granulated sugar
  • 1/4 cup all-purpose flour
  • 3 tablespoons cornstarch
  • 1/4 teaspoon salt
  • 1 1/2 cups milk (I used 1% with stellar results)
  • 2 teaspoons pure vanilla extract
  • 24 tablespoons (3 sticks) butter, cut into 24 pieces and softened at room temperature
Directions
  1. In a medium bowl, combine the sugar, flour, cornstarch and salt. Slowly whisk in the milk until the mixture is smooth. Place a fine-mesh strainer over a medium saucepan and pour the milk mixture through the strainer into the saucepan. Cook the mixture over medium heat, whisking constantly, until the mixture boils and is thick enough that it starts to become difficult to easily whisk. The batter should be thicker than cake batter, more like brownie batter. This step can take anywhere from 5 to 10 minutes depending on your stove top.
  2. Transfer the mixture to a clean bowl and cool to room temperature – this is extremely important! If it is even slightly warm, the frosting won’t beat up properly. If you try to proceed with the rest of the recipe and the mixture is too cold, the butter won’t absorb into the frosting like it should. (This part seriously killed me - wanted to get it done and frost my cupcakes already!)
  3. Once the frosting is completely cooled to room temperature (it should have no hint of warmth at all!), beat the mixture with the vanilla on low speed until it is well combined, about 30 seconds (a stand mixer will work best for this). Add the butter, one piece at a time, and beat the frosting until all the butter has been incorporated fully, about 2 minutes. Increase the speed to medium-high and let the mixer work it’s magic. Beat the frosting for five minutes, until it is light and fluffy. Let the frosting sit at room temperature until it is a bit more stiff, about 1 hour. I actually threw it in the fridge at this point, so that it would stiffen enough for me to pipe on the cupcakes and sure enough, 1 hour in the fridge did the trick.
I piped half of the cupcakes with the plain white frosting and threw some pink in there for the other half. I did half of my cupcakes with caramel Cadbury Eggs and wanted a way to tell them apart. Pipe on your frosting and glory in the accomplishment of a successful cupcake.


 And voila! Done! Oh but the Easter Treats do not stop there. I also made a super yummy dip!


This dip is to die for! My favorite treats are cookie dough and Reese's Peanut Butter Cups, so to have the two together in a dip rocked my world. I picked up this recipe from shugarysweets.com and it was seriously the biggest hit. I whipped up a batch of it and took half to my husband's side's Easter lunch and the other half to dinner with my side of the family, and the bowl was licked clean at both places. I brought along pretzels, shortbread cookies, and graham crackers to dip. They're all good, but the pretzels really do it for me with the salty and the sugary aspect. Here's the recipe!
 
Ingredients
  • 1/2 cup unsalted butter
  • 1/2 cup light brown sugar
  • 1/4 cup creamy peanut butter
  • 8 oz cream cheese, softened
  • 3/4 cup powdered sugar
  • 1 tsp vanilla extract
  • 1/2 cup semi sweet mini chocolate chips
  • 8oz pkg Reese's peanut butter cup Minis (or about 1 1/2 cup chopped Reeses cups)
Instructions
  1. In a small saucepan over medium heat, add brown sugar and butter. Whisk until completely combined and butter is melted. Bring to a boil, remove from heat. Whisk in the peanut butter and vanilla extract. Set aside to cool.
  2. In a large mixing bowl, beat cream cheese with powdered sugar until creamy (about 3-4 minutes. On low, add in brown sugar mixture (that has cooled to near room temp). Mix until combined. Fold in mini chocolate chips and mini Reese's cups. Serve immediately or store in refrigerator until ready to serve. Enjoy with pretzels, animal cracker and graham sticks.